

Memisahkan 2 warna sablon photoshop
Separating 2 screen printing colors in Photoshop
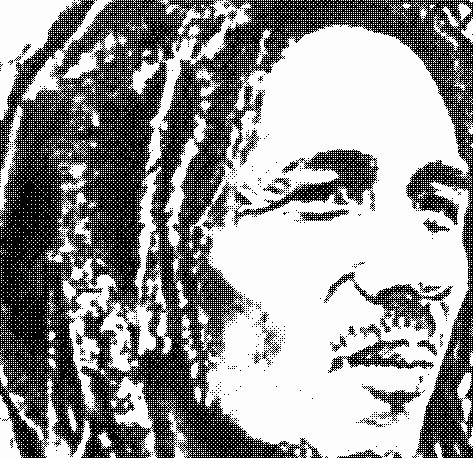
Coba lihat gambar di atas...keren bukan, dan menurut sobat ada berapa warna gambar? Yapz bener, cuma ada 2 warna yaitu hitam dan abu-abu. Kalo warna putih kan udah warna bajunya putih. Tertarik pengen tau cara bikin filmnya? Oke mari kita belajar memisahkan 2 atau biasa disebut dengan Pecah Warna sablon photoshop untuk kaos dengan cara manual.
Take a look at the image above...it's cool, isn't it? And how many colors do you think are in the image? That's right, there are only 2 colors: black and gray. If it were white, the shirt would already be white. Interested in learning how to make the film? Okay, let's learn how to manually separate 2, or what's commonly called "Separating Colors," in Photoshop screen printing for t-shirts.
 |
| pecah warna gambar di photoshop untuk sablon(Breaking Up Image Colors in Photoshop for Screen Printing |
Langkah pertama
Buka Photoshop sobat lalu buat baru File - New, karena kita ingin membuat dengan ukuran kertas A4 maka Width(lebar) 21 cm dan Hight(tinggi) 29.7 cm dan Resolution 100 (terserah)
Buka gambar yang ingin dibuat (disarankan dengan resolusi yg bagus)
Drag gambar ke doc A4 yang tadi telah kita buat, lalu atur
Jika gambar sobat masih banyak warna, pilih Layer - New Adjustment Layer dan ga usah dirubah langsung aja klik OK
First Step
Open Photoshop and create a new File - New. Since we want to create an A4 paper size, set the Width to 21 cm, Height to 29.7 cm, and Resolution to 100 (optional).
Open the image you want to create (high resolution is recommended). Drag the image into the A4 document we just created, then adjust it.
If your image still has a lot of colors, select Layer - New Adjustment Layer and don't change anything, just click OK.

Buatlah 4 kotak dengan menggunakan Rectangle Tool dan letakan disudut seperti gambar diatas (berfungsi untuk patokan pada saat penyablonan nanti)
Duplicate layer 2(layer gambar) sebanyak 3 buah dengan cara klik kanan pada layer lalu pilih Duplicate layer dan beri nama "hitam", "abu-abu", "putih"
Langkah kedua
Pilih layer hitam dan klik MASKS - Add a pixel mask(gambar kotak) - Color Range
Create four boxes using the Rectangle Tool and place them in the corners as shown above (these will serve as a guide during screen printing).
Duplicate Layer 2 (the image layer) three times by right-clicking on the layer and selecting Duplicate Layer. Name them "black," "gray," and "white."
Step Two
Select the black layer and click MASKS - Add a pixel mask (the box image) - Color Range

Maka akan muncul tab Color Range, ganti warna pada Select menjadi warna hitam
Dan gambar akan terseleksi hanya warna hitam seperti gambar dibawah ini
The Color Range tab will appear. Change the Select color to black. The image will be selected in black, as shown below.

Ulangi langkah kedua di layer abu-abu dengan warna Color Range abu-abu dan layer putih dengan warna Color Range putih
Langkah ketiga
Bila langkah kedua sudah benar maka akan terlihat 3 layer dengan hasil seleksi yang berbeda
Oke sekarang kita akan memisahkan 2 warna sablon photoshop dan mengubahnya menjadi raster(titik-titik kecil)
Pilih hanya pada layer hitam
Repeat the second step on the gray layer with the gray Color Range and the white layer with the white Color Range.
Step Three
If the second step is correct, you will see three layers with different selection results. Okay, now we will separate the two screen printing colors in Photoshop and convert them to raster (small dots).
Select only the black layer.

Kemudian pilih menu Image - Mode - Grayscale, jika muncul pilihan Marge,Cancel,DontMarge pilih Marge dan jika muncul pesan Discard color information pilih Dischard
Pilih lagi Image - Bitmap, jika muncul Flatten layer pilih OK
Maka akan muncul kotak Halftone Screen isikan frequency 70, Angle 25 dan Shape Elipse klik OK
Dan bila gambar dizoom akan terlihat titik raster seperti gambar dibawah ini
Then select the Image - Mode - Grayscale menu. If the "Merge," "Cancel," or "Don't Merge" options appear, select "Merge." If the "Discard color information" message appears, select "Discard."
Select Image - Bitmap again. If the "Flatten layer" message appears, select "OK."
A Bitmap box will appear. Enter the resolution as previously set, which is 100, or you can change it to your liking. Change the "Method" to "Halftone Screen," click "OK."
A Halftone Screen box will appear. Enter the frequency as 70, the angle as 25, and the shape as "Ellipse," click "OK."
When the image is zoomed in, you will see raster dots as shown below.
Simpan dengan meng export menjadi JPEG, bisa lihat caranya disini
Dan gambar untuk dicetak warna hitam sudah ada
Sekarang kita akan membuat warna abu-abunya
Sebelum itu kita kembalikan dulu doc seperti sebelum di rubah menjadi raster dengan pilih History lalu cari Grayscale
Simpan dengan meng export menjadi JPEG, bisa lihat caranya disini
Dan gambar untuk dicetak warna hitam sudah ada
Sekarang kita akan membuat warna abu-abunya
Sebelum itu kita kembalikan dulu doc seperti sebelum di rubah menjadi raster dengan pilih History lalu cari Grayscale
Save by exporting it as a JPEG. You can see how here.
And the image for printing in black is already there.
Now we'll create the grayscale. Before that, let's restore the document to its original state before converting it to raster by selecting History and then searching for Grayscale.
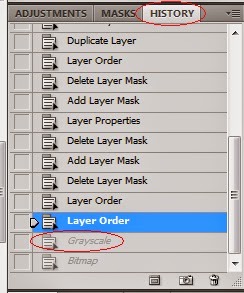
Jika sudah ketemu klik saja tepat diatas Grayscale seperti gambar diatas, maka secara otomatis documen akan kembali ke tampilan sebelum dirubah menjadi Grayscale tadi
Oke lanjut untuk warna abu-abunya
Jika sudah ketemu klik saja tepat diatas Grayscale seperti gambar diatas, maka secara otomatis documen akan kembali ke tampilan sebelum dirubah menjadi Grayscale tadi
Oke lanjut untuk warna abu-abunya
Once you've found it, simply click directly above the grayscale image, as shown above. The document will automatically return to its original grayscale appearance.
Okay, let's move on to the grayscale color.

Bila benar maka gambar untuk warna abu-abunya seperti gambar dibawah ini, terlihat titik raster.

Tekan Ctrl pada keyboard sambil diklik 2 layer, lalu klik kanan Marge Layers
Dan ulangi langkah ketiga diatas tadiBila benar maka gambar untuk warna abu-abunya seperti gambar dibawah ini, terlihat titik raster.
Press Ctrl on your keyboard while clicking two layers, then right-click "Merge Layers." Repeat the third step above.
If correct, the grayscale image will look like the image below, with visible raster dots.
 Lalu simpan dengan meng export
Bagusnya si kalo gambar2 kaya gini tuh di bahan kaos atau Sweater/Jaket
Bagusnya si kalo gambar2 kaya gini tuh di bahan kaos atau Sweater/Jaket
Then save it by exporting it. It would be great if images like this were printed on t-shirts or sweaters/jackets.
 Selesai dehh..coba buka 2 file yang tadi telah disimpan, kita akan mendapat 2 gambar raster yang berbeda disebelah kanan untuk kita sablon warna hitam, dan yang disebelah kiri untuk kita sablon dengan warna abu-abu.
Kalo udah di print filmnya, langsung aja kita ke proses penyablonan..
Kalo udah di print filmnya, langsung aja kita ke proses penyablonan..
That's it... try opening the two files you saved earlier. You'll have two different raster images: the one on the right is for screen printing in black, and the one on the left is for screen printing in gray.
Once the film has been printed, let's move on to the screen printing process.


